As an Amazon Associate, we earn from qualifying purchases. Some links on this site are affiliate links at no extra cost to you. Our recommendations are based on thorough research and editorial judgment.
Waterproofing Transitions at Tub-to-Wall Junctions
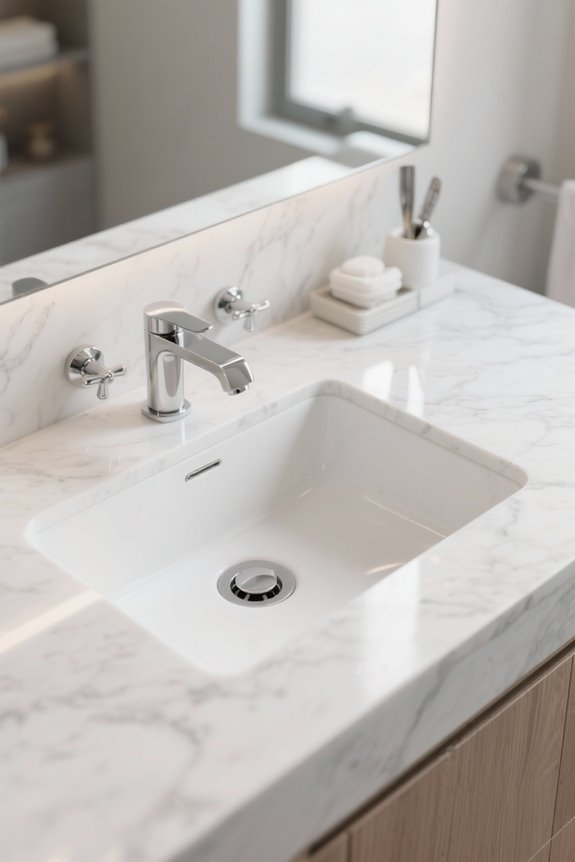
Waterproofing changes at tub-to-wall junctions is essential for preventing water damage, which may stem from deteriorated caulk or improper installation. A high-performance caulk, such as waterproof silicone, guarantees a flexible, moisture-resistant seal. Before application, clean surfaces thoroughly and use painter’s tape for precision. Regular maintenance, including inspections for cracks or mold, is necessary to maintain a durable barrier. Utilizing a liquid waterproofing membrane and impervious tile can further enhance protection. Additional tips for installation and maintenance follow.
Key Takeaways
- Ensure the use of high-performance waterproof silicone caulk for lasting moisture resistance at tub-to-wall junctions.
- Regularly inspect and replace deteriorated caulk to prevent water intrusion and mold growth.
- Employ a liquid waterproofing membrane beneath tiles to enhance moisture control before installation.
- Maintain clean and dry surfaces for improved adhesion when applying new caulk.
- Smooth caulk seams properly and allow sufficient drying time to ensure an effective waterproof seal.
Importance of Waterproofing at Tub-to-Wall Junctions
You may be interested


Waterproofing at tub-to-wall junctions is a fundamental aspect of bathroom construction and maintenance, considerably influencing the overall durability and functionality of the space. This significant practice effectively prevents water penetration behind walls, which can lead to structural damage and mold growth. Achieving a reliable waterproofing seal between the tub and wall typically entails using caulk, which serves as a barrier to moisture. Regular maintenance checks on these seals are essential, as identifying wear can help avert leaks and expensive repairs. Furthermore, employing impervious tile paired with a liquid waterproofing membrane enhances moisture resistance at tub-to-wall junctions. Proper and timely waterproofing measures are essential for sustaining the integrity and longevity of the entire bathroom system, ensuring a trustworthy installation for years to come. Mold-resistant bathroom caulks are highly recommended for this purpose as they provide long-lasting protection against moisture and fungal growth.
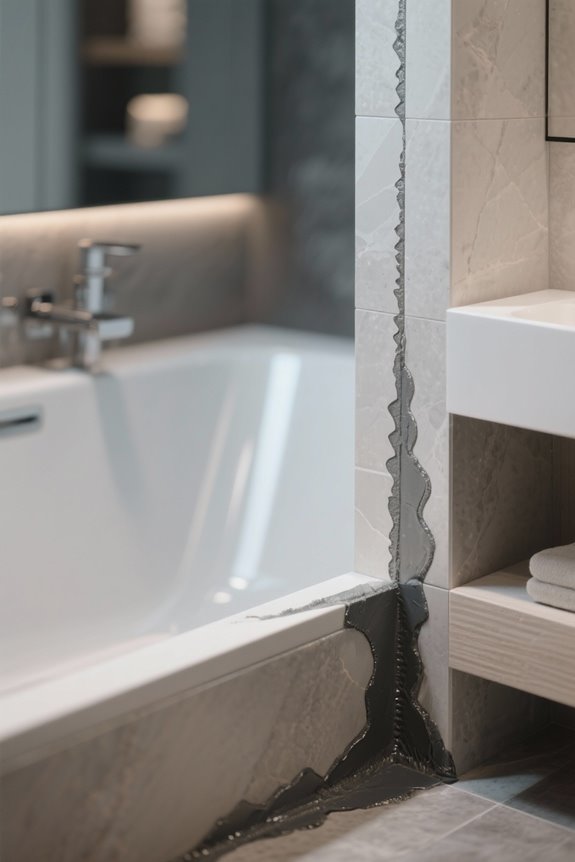
Common Causes of Water Damage
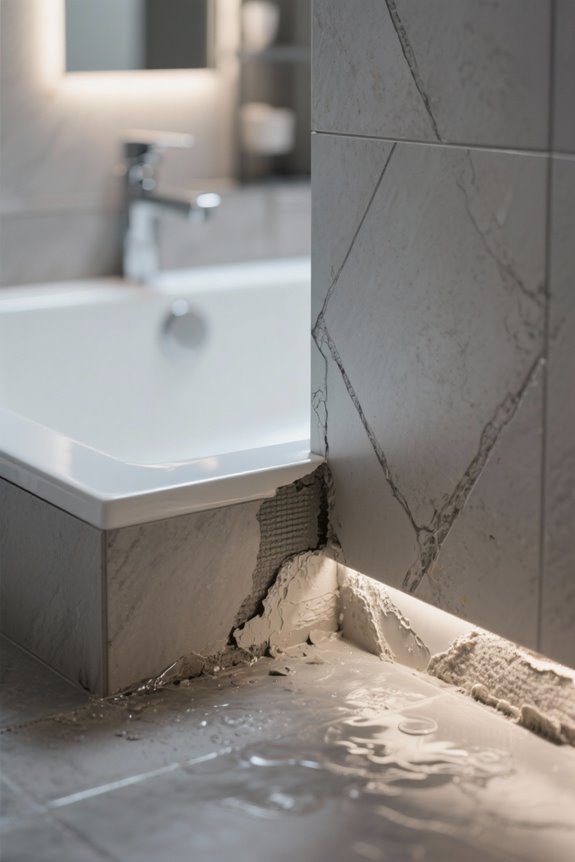
The junction between a bathtub and surrounding walls is a critical area prone to water damage, primarily due to several common factors that can compromise the integrity of the seal. Deteriorated caulk or grout, which cracks over time, allows moisture to seep behind tiles, leading to hidden leaks. Improper installation or absence of a waterproof barrier during backerboard application can trap moisture, encouraging mold growth and potentially causing structural damage. Additionally, insufficient use of water-resistant materials exacerbates issues; without impervious tiles or well-sealed grout lines, water intrusion becomes more likely. Consequently, homeowners should conduct regular maintenance checks, ensuring full access to these junctions. For optimal results, select caulks with quick curing times and strong adhesion properties to prevent leaks and mold growth. For assistance, please let your local Home Depot provide guidance on material choices and sealing techniques.
Materials Needed for Waterproofing
Choosing suitable materials is essential for effective waterproofing at tub-to-wall junctions, as using high-quality components can considerably reduce the risk of water damage. High-performance caulk, specifically designed for wet areas, is critical to guarantee a watertight seal. A 6 mil poly barrier is recommended beneath cement backer units (CBUs) to prevent moisture infiltration. Incorporating impervious tiles, like porcelain, enhances water resistance notably in the junction area. Liquid waterproofing membranes serve to provide additional moisture control, applied directly to the setting bed of the tile before installation. To achieve the best results, appropriate caulking tools are necessary, along with effective sealing techniques that streamline the application of these waterproofing products. Regular inspection and maintenance of caulking will guarantee ongoing protection against water intrusion. Condensing water heaters contribute to lower greenhouse gas emissions compared to traditional tanks, aligning with eco-friendly practices.
Preparing the Area for Caulking
Preparing the area for caulking at the tub-to-wall junction is essential to guarantee the longevity and effectiveness of the waterproof seal. First, employ effective cleaning techniques to remove dirt, soap scum, and moisture, ensuring the surface is clean and dry before proceeding. Surface preparation should also include carefully removing any old caulk with a screwdriver, while protecting surrounding areas with blue painter’s tape to prevent damage. Inspect the seam for gaps or cracks that may compromise waterproofing, addressing these concerns beforehand. Once the area is clean, allow it to dry completely, as any remaining moisture may hinder adhesion methods. By following these steps diligently, the foundation for a durable, watertight seal is established, ensuring long-lasting protection against moisture infiltration. For additional storage and organization in your home, consider using expandable cabinet shelf organizers to maximize space efficiency and maintain order.
Removing Old Caulk: Step-by-Step
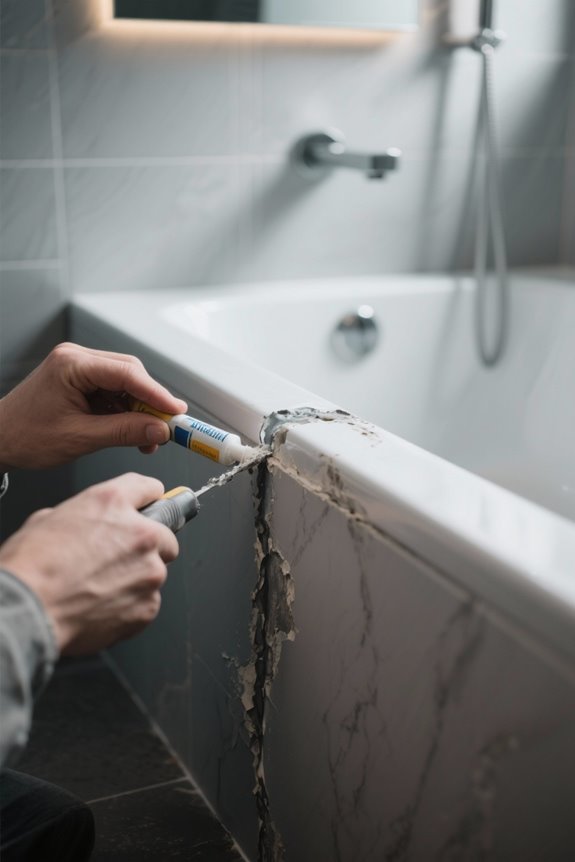
After ensuring a thorough preparation of the surface area, the next step involves the careful removal of old caulk at the tub-to-wall junction. Best practices start with applying blue painter’s tape along the edges to protect surrounding surfaces from damage. A tools checklist should include a screwdriver or specialized caulk removal tool, useful for scraping away old material without harming the tub or wall. Safety precautions are essential, so wearing gloves is advisable to prevent skin contact with potentially harmful substances. Once the old caulk is removed, the seam area must be cleaned thoroughly, ensuring a dry, clean surface that enhances the adhesion of new caulk, ultimately securing a watertight seal to prevent future leaks. Solid surface vanity tops offer a combination of durability and aesthetic appeal that can complement any bathroom remodel.
Selecting the Right Caulk for the Job
An important aspect of achieving a reliable water seal at the tub-to-wall junction involves selecting the appropriate caulk, which plays an essential role in guaranteeing long-lasting protection against moisture infiltration. For best results, a waterproof silicone caulk is recommended, as it provides a flexible seal capable of withstanding continuous moisture exposure. A caulk types comparison reveals that mildew-resistant options are particularly advantageous in wet areas, reducing mold growth. Bathroom-specific formulations often include additives to enhance adhesion and durability. Application tips suggest utilizing a caulking gun for clean, even lines, while observing the manufacturer’s drying times. Additionally, checking the expiration date on the caulk guarantees effectiveness, as expired products may fail to seal, leading to leaks and subsequent damage. When mounting mirrors, heavy-duty mirror clips provide secure mounting options and ensure stability and safety, which is crucial for maintaining a polished look and preventing moisture-related issues in bathroom environments.
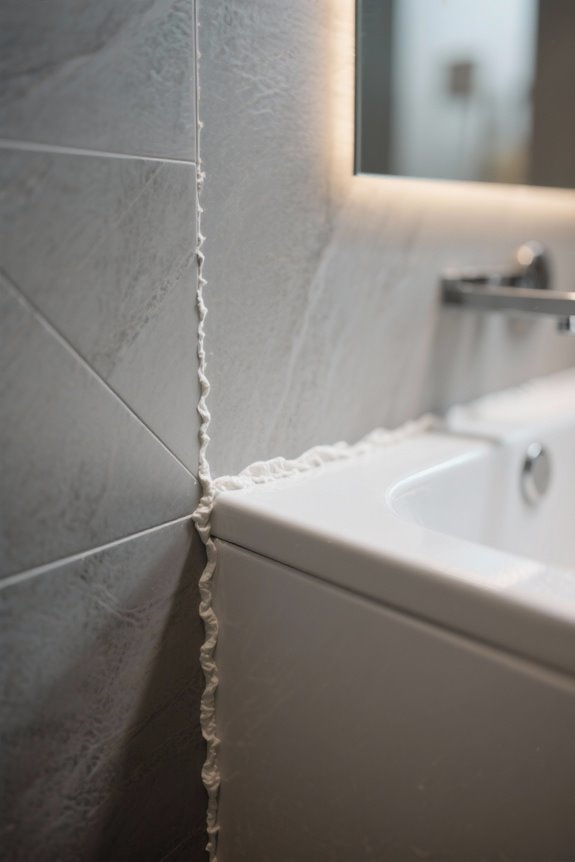
Applying New Caulk Effectively
With the appropriate caulk selected for the tub-to-wall junction, effectively applying it becomes the next pivotal step in achieving a water-tight seal. First, puncture or cut the tip of the caulking tube before inserting it into a caulking gun, following the manufacturer’s instructions. Utilizing caulk application tips, a straight, even bead should be applied within the joint area, ensuring full contact with surfaces to prevent common caulk problems. After the application, smoothing the bead with a moistened finger guarantees a clean finish. It is also essential to remove painter’s tape only after the caulk has fully cured, maintaining a distinct edge. Regular maintenance checks on the caulk will help identify potential issues, preserving the integrity of the seal for long-term effectiveness while considering choices in caulk colors. Many nautical shower curtains incorporate waterproof and water-resistant features, which can be beneficial in maintaining a moisture-free environment in the bathroom.
Techniques for Smoothing Caulk Seams
Smoothing caulk seams at the tub-to-wall junction is essential for both aesthetic appeal and functional performance, ensuring a reliable waterproof barrier. Effective caulk application techniques begin with applying a straight bead to achieve uniformity. After applying the caulk, utilizing smoothing tools options, such as a moistened finger or a specialized caulking tool, can enhance the finish. These methods help eliminate ridges and create a sleek appearance. To achieve clean lines, caulking best practices include using painter’s tape along edges to prevent smearing during the smoothing process. Regular maintenance of the smoothed caulk will help monitor for cracks and deterioration, thereby ensuring the seal remains effective, especially under the stress of water-filled bathtubs. Additionally, using advanced silicone caulk, like the GE Advanced Silicone Caulk for Kitchen & Bathroom, provides a 100% waterproof solution that outperforms standard sealants in high-moisture areas.
Ensuring Adequate Drying Time
Ensuring adequate drying time for waterproofing materials is essential in maintaining the integrity of tub-to-wall junctions, as insufficient drying can permit moisture retention that fosters mold growth and compromises the overall structure. Typically, it is recommended to wait at least 24 hours after applying waterproofing materials before exposing these areas to water, allowing complete evaporation and ideal adhesion. Different waterproofing products necessitate careful product selection, given their varying drying times, which should be confirmed through the manufacturer’s instructions. Additionally, humidity effects can greatly impact drying conditions; elevated humidity levels may prolong necessary wait times. Regular inspections of the waterproof seal are important, as premature exposure to water can undermine the effectiveness of the waterproofing measures employed at the junctions. Shower curtain liners often incorporate weighted designs to prevent billowing, which also helps in keeping water within the shower area, thereby reducing moisture exposure to tub-to-wall junctions.
Maintaining Your Caulk Over Time
Maintaining the caulk at the tub-to-wall junction is essential for preventing water damage and ensuring the longevity of a bathroom environment. Regular inspections are vital; users should check for cracks or deterioration, especially after heavy tub usage, as the weight of water can stress the caulk. A caulk types comparison reveals that high-quality, waterproof options designed for wet areas greatly enhance durability. Longevity tips include reapplying caulk every few years to prevent drying out and loss of effectiveness. Additionally, a sealing techniques review will guide homeowners to apply caulk smoothly, ensuring a tight seal that withstands moisture. By prioritizing these maintenance practices, users can avoid costly repairs and maintain an effective barrier against water intrusion. When choosing materials for related bathroom upgrades, rustproof shower curtain rods made from stainless steel or heavy-duty iron can further enhance the durability and aesthetic appeal of wet environments.
Signs That Caulk Needs Replacement
The integrity of caulk at the tub-to-wall junction is vital in preventing water damage, yet several signs indicate when it is time for replacement. Visible cracking or peeling, often noticed around the edges, compromises the waterproof seal. Discoloration or mold growth around the caulk reveals moisture retention, indicating the need for a replacement. Additionally, gaps developing between the caulk and the tub or wall suggest that the seal integrity has diminished over time. Regular moisture testing is important, as the caulk lifespan can be shortened due to water exposure and environmental factors. A heavy accumulation of water pooling at the tub edge often signals a leak, requiring immediate action to prevent extensive damage and guarantee lasting waterproofing effectiveness.
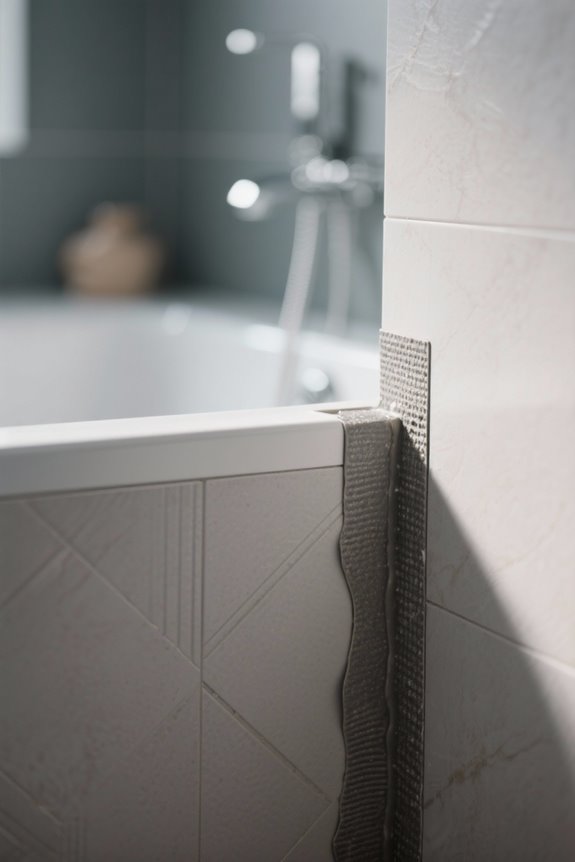
Additional Waterproofing Measures
After evaluating the condition of caulk and determining its need for replacement, homeowners can further enhance their waterproofing strategies at the tub-to-wall junction. Applying a liquid waterproofing membrane over the backerboard serves as an effective barrier against moisture infiltration, addressing hydrostatic pressure concerns. Utilizing impervious tiles, like porcelain, will reinforce this protective layer, limiting the risk of water damage. Additionally, a meticulous grout application paired with a quality grout sealer will prevent water penetration through tile joints. To further safeguard against leaks, homeowners should consider adding advanced sealants at the seams between the tile and tub. Employing these waterproofing accessories creates a robust defense, ensuring long-term durability against moisture-related issues in bathroom spaces.
Frequently Asked Questions
How to Seal a Gap Between a Shower Wall and a Tub?
To seal a gap between a shower wall and a tub, one should utilize proper caulking best practices, ensuring thorough cleaning. Regular shower wall maintenance and effective tub installation techniques are essential for long-lasting protection against moisture.
What Is the Best Kind of Sealer to Use Between Your Tub and the Wall?
The best sealer between a tub and wall are silicone sealant options, particularly 100% silicone caulk, known for waterproofing techniques. Hybrid silicone-latex caulk also excels, providing flexibility and ease of application compared to traditional caulk.
How to Seal a Bathtub to a Wall?
Sealing a bathtub to a wall resembles fortifying a castle’s perimeter. Employ precise bathtub installation techniques, utilize effective wall moisture barriers, and select recommended sealing products to create an impenetrable defense against water damage.
How Do You Seal Where Tile Meets a Bathtub?
Sealing where tile meets a bathtub involves applying appropriate bathtub caulking tips, ensuring ideal tile edge protection. A waterproofing materials comparison highlights the effectiveness of silicone or silicone-latex blends for superior moisture resistance and flexibility.